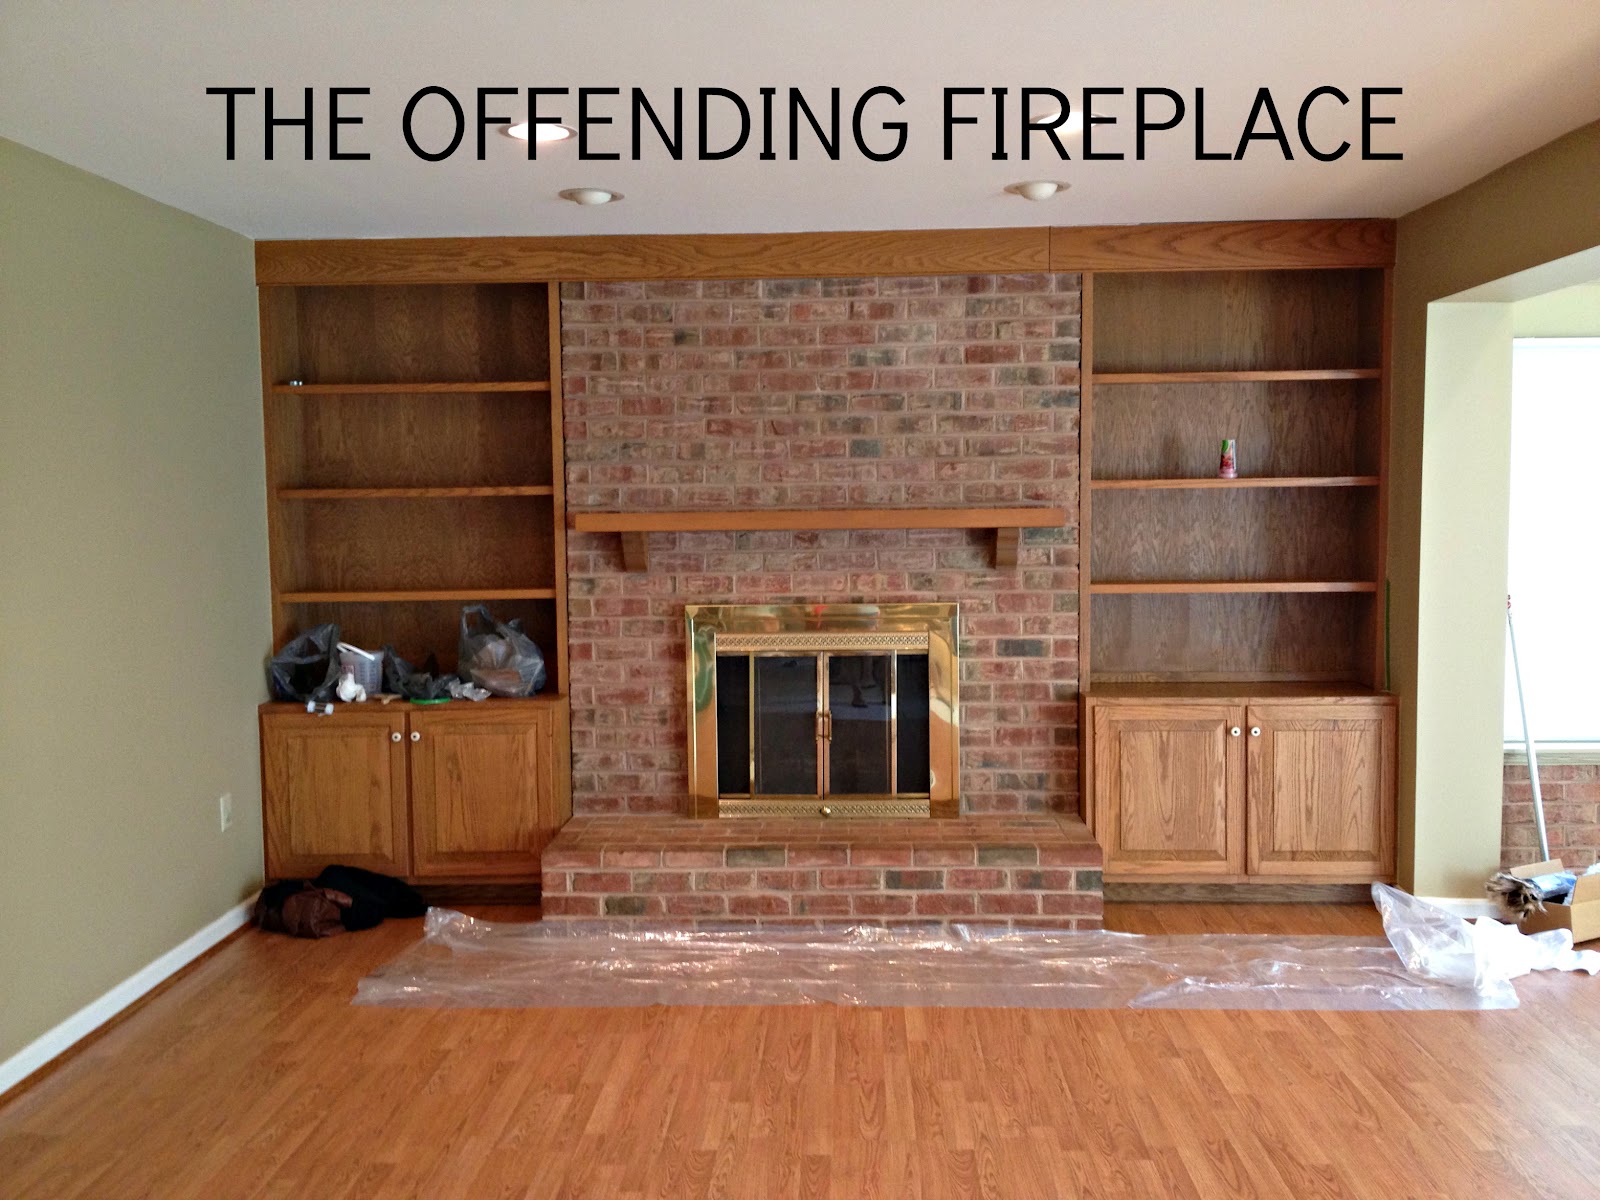
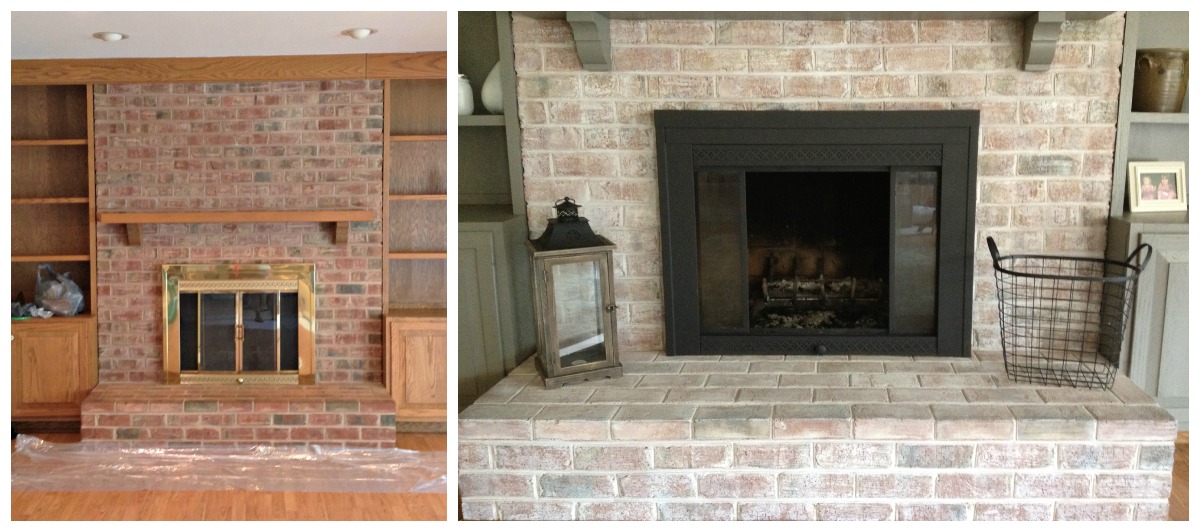
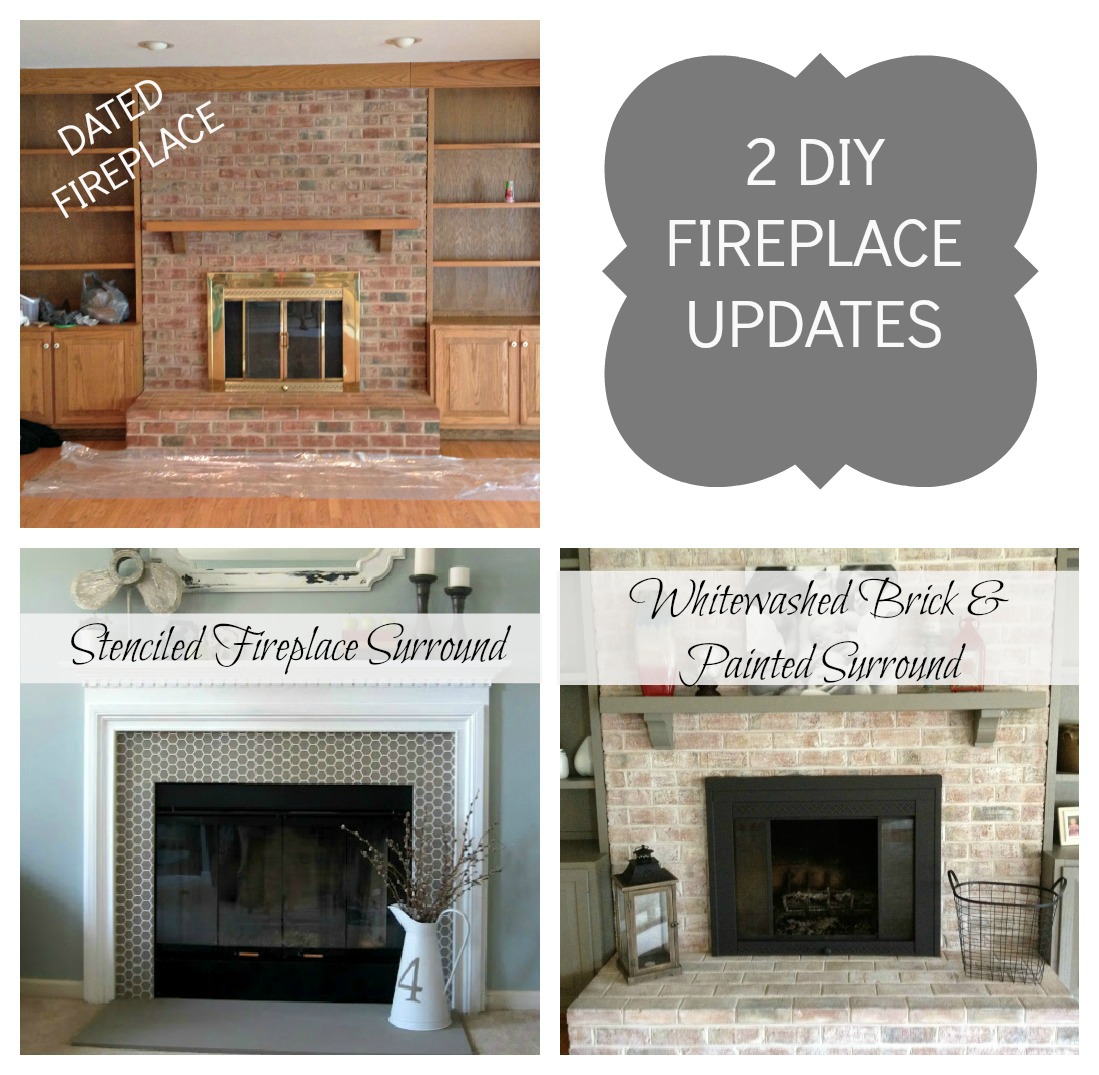
Even though gold jewelry is back in style, a dated, brassy fireplace can put a major damper on the style of a room! Updating your fireplace can seem overwhelming, but let me tell you it’s not as hard as it seems and if you’re really determined (like me) you can get it done less than 24 hours!
Here’s the story behind this makeover… One of my best gal pals was moving into a new house, so I trucked on down to Maryland to help move and to try to tackle a few fun projects. The fireplace wasn’t even something they had thought of me working on, but the moment I walked in, it was SCREAMING for some DIY love from me.
Here’s the order of my steps:1- Whitewashed the brick2- Painted the mantle and built-ins3- Painted the brass surround
******************************************How to Whitewash Brick:
Whitewashing brick is really simple! You’ll need an inexpensive paint brush, a plastic container, a rag, water, and paint.
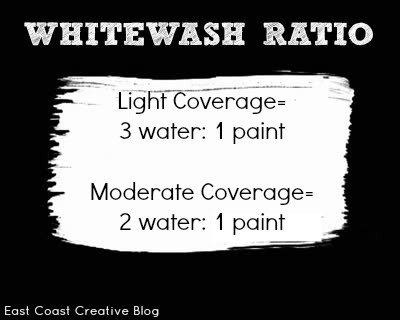
I mixed the paint and water with a ratio of 1 part paint to 3 parts water. If you want more coverage, increase your paint and for less coverage increase the water.
Start in one corner and work in small sections. Your paint mix will be really thin, so you’ll want the rag in hand to catch any drips. Brush your paint mix on a 1×1 area and then immediately use your rag to rub it deeply into the brick and then remove any excess. The process goes really quickly, but I’ll warn you it’s a little messy. The grout can be a tad sandy, so you’ll definitely need to vacuum when you’re done. The whole fireplace and hearth took me less than 30 minutes. The difference in color is awesome!
After whitewashing and painting the shelves and mantle, it was time to get rid of that brass! My exact words to my gal pal Mandy were, “Do you trust me?” and I’m so glad she did!
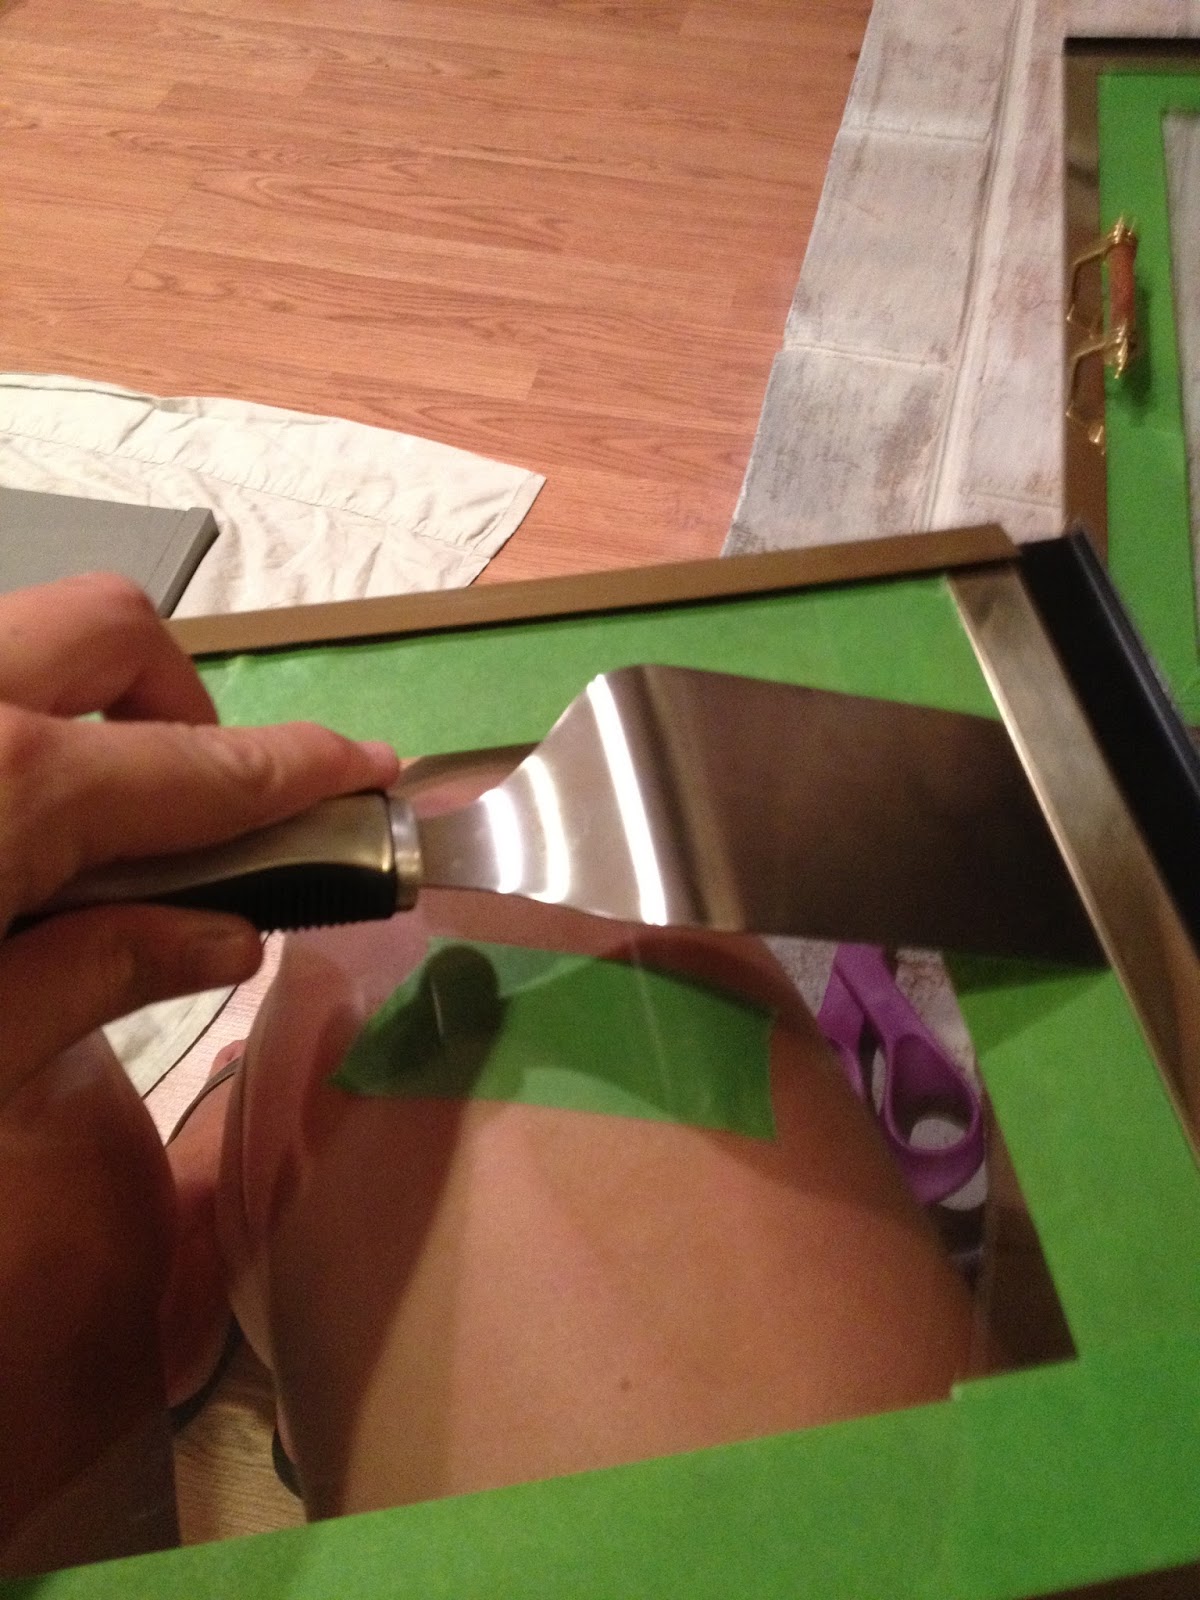
How to spray paint a brass fireplace surround:There are some key items you’ll need to do this project right: Frog tape, craft paper, disposable plastic drop cloth, and Rust-oleum High Heat Ultra Spray Paint
 We started off by taping off the brick right around the surround. Make sure that you get it as close as possible. We were lucky enough that the tape could slip behind the surround, so there was no chance of bleeding through. Once the edges are take care of, you’ll want to use the craft paper and tape to make sure all of the brick is covered. It’s sorta like wrapping a really big, awkward present!
  Once the brick was covered, we cut a section from the plastic drop cloth and wrapped the mantle in it. We were really careful to make sure we’d taped it tightly, so no paint could sneak in.
For the glass doors, we used more tape and paper. I found that if I used a spatula, I could get the tape really close to the edges for a perfect, crisp look.
Now it was time for a little craziness… Making a spray paint cocoon! Since we were spraying in the house, we needed to seal off everything. Basically, I got in, and we sealed the drop cloth all around me. WARNING: the fumes will be very strong. I recommend a face mask. I didn’t have one, so we used a towel.
Thankfully, this paint is awesome and doesn’t require more than one solid coat. I, on the other hand, required about 3 showers before all the black paint was off my face and hands! It was totally worth it though!
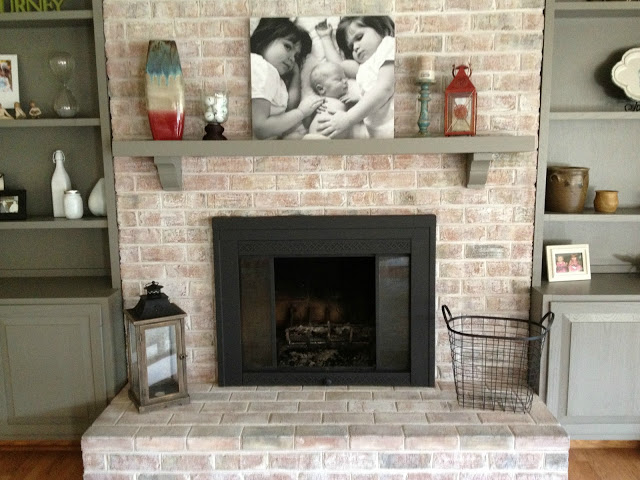
Here’s the finished product. Doesn’t it look so much better? 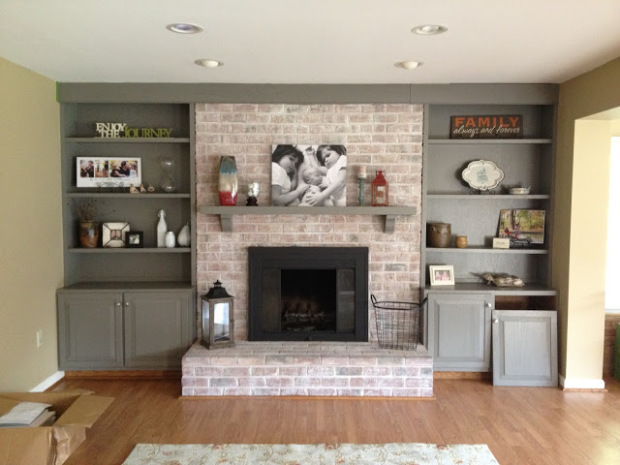 I’d love to show you a perfectly styled mantle, and all the doors on, but we were on a tight time schedule, and I had to get back to PA. So this was DIY on the fly!
I was so pleased with the update and loved that the entire project took about 4 hours of work time and cost less than $30.00! If you have a fireplace that you were wishing you could change, I totally recommend doing it yourself! The impact it can have on a space is incredible! And if you missed it, Jess transformed her fireplace with some paint and a stencil this past summer. Two updates= no excuses not to get rid of those dated fireplaces, people!
And, I just have to add, that only only is Mandy one of my very favorite people in the entire world, she’s all a rockin’ sponsor of this very blog!! She’s our Thirty-One Gift’s Consultant and hooks up our readers for all kinds of giveaways and deals! Christmas is coming people, head over to Mandy’s website HERE and check out the awesome products they have in the current catalog! I’m so loving the new Metro bags! **UPDATE: Due to the popularity of this post and lots of reader questions, I thought I’d answer a few of the common questions here.Q: What kind of paint did you use on the brick? A: We just used white paint we had on hand. It was eggshell and worked fine. I really think any finish would work okay because you’re watering it down anyhow.Q: What color did you use on the mantle and shelves? A: Ahh! I wish I knew! I do know it was from Lowes 🙂 (Take a copy of the photo with you and they can color match it!)
Did you know East Coast Creative’s Most Popular Blog Project of all time is now for sale?!?
Get Ready to Break Up with Your Bedtime Routine!
Check out our online store!


That is a GREAT transformation! Well done and I really liked the brick whitewash! I never knew it was that easy!
Thanks!
Brad
Wow it looks amazing! And it looks easy. Now all I need is a house with a brass fireplace…
Love it! And love YOU Mandy!! 🙂
Looks amazing! What color did you paint the built-ins/mantel? Great job!
What an amazing transformation! Our fireplace is so out of date – I love the white wash idea, but I don’t know if my hubby will go for it. Our fireplace is so odd … we can’t even use it because there are no screens or doors that will fit it! I love what you did for your friend … and wish you could come work your magic on my little home!
You have inspired me! I’m painting my brass fireplace this weekend while my husband is out of town! It’s exactly the same as the one in the post! Thank you!
I can’t wait to try the paint on my brass insert. I spray painted brass light fixtures with rubbed bronze. Next, it’s the ceiling fan. I never knew about the BRASS fireplace insert and the High Heat Ultra paint.
Love it! I actually bought that exact same spray paint about 5 months ago and still haven’t had a chance to use it! I’m on it now, girls! Can’t wait to try to work on the husband to white wash the brick too! Thanks for the kick in the pants!
This post couldn’t have come at a better time! I was just wondering how to do this because I have a brass fireplace just like that one. Now I know! Thanks!
OMG!!! I LOVE it!!! I need to paint out the brass on my fireplace but I am scared to do it in the house. I am trying to figure a way out to take the doors off to paint them and then of course, rip out the awful, 80’s, shiny, marbelized, hunter green tiles surrounding them … 😛 YUCK just doesn’t cut it!!
Wow! That looks great. Now I know what to do with my hideous brick fireplace!
That makes a huge difference! Great job!!
Michelle
I love it! I have a fireplace in need of your diy help!!! But instead of brick I have floor to ceiling 1980’s stone with an unfinished (spinterey) wood mantle that is impossible to dust. We’ve only been in our house for 4 mos. And I am at a loss on how to update. Help!!!
I just moved in to my house about a month ago and have the same 80s rock wall with the splintery unfinished mantle. It’s growing on me but I am curious how you decided to update yours. I will definitely be spraying the brass black.
I love this transformation! The look is so sophisticated as opposed to its original state! Would you mind sharing the color of the surrounding paint? It’s resolving a gray green on my monitor. Thank you!
I love this. I am just wondering what color paint was used on the mantel and built-ins?
You need a 3M R6211 Respirator Mask from Home Depot
I really love the whitewash brick! Now this may seem like a dumb question but how would I know if it would look good in my house? I am afraid to paint the brick and it come out looking horrible!
Now this is probably a really dumb question…but what kind of paint was used to whitewash? There’s latex, semi-gloss, flat, etc?
Now this is probably a really dumb question…but what kind of paint was used to whitewash? There’s latex, semi-gloss, flat, etc?
I was wondering the same thing Karen was. Would you use oil-based or latex? It seems like oil-based would be more permanent and a lot less likely to wear off. But it’s a mess to clean up! I’m guessing you go with standard flat white, is that right?
Oil and water don’t mix, so it would have to be water based paint.
Oil and water don’t mix, so it would have to be water based paint.
I followed this exactly, and it completely changed (updated) the look of my 70’s yellow brick and brass surround. I am so incredibly pleased with the outcome, and I can’t get over how quick and inexpensive it was to do! Thank you!
I used some leftover flat interior latex paint we had in the garage. I used a cup of paint and 3 cups of water. It was plenty to do my fireplace (standard – hearth, brick up to mantle).
Sorry! One last thing. I removed the surround (so, I guess I didn’t follow this EXACTLY). It was only held in with 4 thumb screws. So, I took it outside to spray paint it.
When we owned our home in Texas, I painted our brassy surround with that same product. Like FrogMom, I also removed the surround, and painted it in the garage. Our brick was already white, so I just cleaned it up a bit.
We are convinced that it helped us when we sold that house to have an updated look on the fireplace!
We now have another fireplace that needs some updating, but it’s not the surround, it’s the brick…just TOO DARK so I think I’m going to try your whitewashing technique! Thanks for the tutorial!
OMG I just found this and am laughing so hard about your cacoon! We have the same nasty brass that I’ve already spray painted once. You are so funny!
One word
Thank you
just a thought… instead of getting inside of the “cocoon”, just cut an x in the plastic and stick your arm through
YOU… are a smart cookie! “Work smarter not harder.”
You inspired me! I have your twin in my house so I just completed the white wash and LOVE it.
I’m working on getting my sweet husband to remove the brass for a good cleaning and painting.
Do you think you can white wash exterior brick?
Yes, can we do exterior brick? That would be awesome.. also, the built ins.. did you sand first? What paint did you use? Does the brass need any prep or does that paint just adhere? Thanks!
I was really debating painting all white or whitewashing my current fireplace… now that I see your transormation I am definitely leaning towards whitewashing. Amazing transformation!
I was really debating painting all white or whitewashing my current fireplace… now that I see your transormation I am definitely leaning towards whitewashing. Amazing transformation!
I am SO doing this white wash to my own fireplace!!!! Thank you so much for sharing and PS LOVE those pics, so delightful!!!
I just picked up a can of rustoleum high heat to brush on the interior of the fireplace to freshen up the half charred interior – I think I’ll use the rest with a mini roller for the outside – just an option for those who don’t want to spray.
Thinking of doing mine too (both the brick-whitewashing and the brass-painting) and stumbled across this blog after a google search– love the pictures and the color choices and the tips! All of it. This is the best-looking and the best-instructed of all the ones I’ve found. I’m wondering though, none of the blogs I’ve looked at for the brass-painting have any updates after a season of actually using the fireplace… Do you know if your friend has had any wear and tear noticeable to the painted brass? Guess it doesn’t much matter since for me keeping the brass isn’t an option and I can’t afford to replace it, but I’m just curious.
I was so excited when I found this website. It was so helpful in trying to update a clients fireplace with a small budget. But I did want to share this, I found the Specialty High Heat Paint Spray in paint (same thing but in liquid paint). Amazing!!!
[…] other projects we’ve done using Frog Tape®! My Chevron Accent Wall Mosaic Accent Wall Fireplace Makeover If you haven’t tried FrogTape painter’s tape yet, what are you waiting for? I mean […]
Was the spray paint a matte finish? I found the ultra in semi gloss. Also, is there a difference between the Rustoleum Ultra high heat and Rustoleum high heat? Thanks so much, your project looks terrific!
Hi Monica,
I’m writing a post about some changes we would like to make to our family room and I’d love to include the picture of your white-washed brick wall as an inspiration photo. Of course, if you allowed me to use the image, I would link back to this post.
Thanks!
Sure thing Kim!! Thanks for asking! 🙂
Happy Thanksgiving!
My house looks identical to the picture you’ve shown. We have whitewashed the bricks of the fireplace and it already makes a world of difference! Thank you! Did you ever find out the color grey used on the shelves?
Must know the brand and color of paint on the built ins and mantle… I love it!! If you don’t know, can you recall if it was latex (and what finish) or chalk paint. What clear coat finish did you use?
Oh woooow. This is amazing! Can I send you a photo of our fireplace for upgrade ideas? I’d love your input. You are an artist!
I have one of those ugly brass fireplace surrounds, I wonder if it would be just as easy to remove the little devil and spray paint it outside? I know on mine there is a HUGE space along the top. I LOVE the white washed brick!
Hey! I know some people have done that! It just depends on how well it’s connected and if you want to deal with re-installing it. Ours was really stuck, so we just made it work inside! Good luck!
[…] search online, I had the idea to possibly whitewash the brick, and when I showed this photo from East Coast Creative to Wyatt, he was […]
[…] update a fireplace: paint or enhance your bricks with stone color enhancer, spraypaint an old fireplace frame and screen […]
Hi Monica!The transformation is lovely! Do you mind sharing what color you painted the surrounding bookcase? I love that color choice. Thanks!
I was wondering if you have tried doing this technique with a dark, possibly gray or black paint?
[…] surround. Replacing the door knobs and light fixtures is easy, but I had no idea how to update the fireplace until I found this tutorial. It looks like most of the work is in prepping. My fireplace […]
The best ever! What color is the green/gray paint?
Followed this and tried it on our fireplace. SO HAPPY! Thank you for the instructions
Hi Julie,
So glad to hear that you tried it and love the results. We would love to see photos, you can send them to our email eastcoastcreativeblog@gmail.com, thanks for reading the blog!
I have this same fireplace. How did you paint the brass trim around the glass sliding door (the piece that’s tucked back behind the fixed glass)?? This is my obstacle to starting!
Love it! We plan to do this to my sisters fireplace.
Just a quick question, is there any reason why you
opted not to paint the toe kick portion of the built in?
Just curious.
Thank u!! I have this EXACT fireplace. I can’t wait… White washing is brilliant as well. Thank you!
My Living room is almost IDENTICAL to this. So much so that my friend sent me this wondering if this was our update! See our update here: http://byloverefined.wordpress.com/2014/10/07/books-shelves-and-dragons-day-6/ We have yet to do the fireplace but this is some good inspiration!!
Lauren
Still no update for the gray paint color? I LOVE this look and would love to replicate it. However, I have zero natural design sense so I know whatever gray I choose will not be quite right. haha!
I’m still looking for the grey paint color as well! I white washed the fireplace last week. I picked up a “natural grey” by behr for the walls but it looks more of a lavender grey. The green/grey here looks so much nicer! Can you please direct us toward the grey you used???
Going thru the post and all the comments I don’t see the color/brand of great paint used on the mantle and bookcases. Sorry if I missed it somewhere but could you post again?! Thanks bunches!
Did you ever get the paint color and brand? I love it too but can’t match it.
My husband and I want to spray paint our brass fireplace as well. We bought the high-heat ultra spray paint and the can says it’s a semi-gloss sheen. Is that what you used? In the picture the mantle seems to be a flat color. Thanks!
[…] Via: eastcoastcreativeblog.com […]
Hi there! LIke many others in the comments section, I’d love to know which shade of gray you used for the surround. I am having a hard time matching it! Thanks!!
HI, I love the transformation. What did you to the cabinets? They appear to have been painted or replaced? Can you describe what you did there?
Hey all! I just wanted to share the gray I ended up using. Since a lot of folks in the comments were asking, and I couldn’t find a response anywhere….I used Behr Marquee in Smoky Trout. Not an exact match, but about the best I could do and I think it looks great with our fireplace finished product 🙂
Am I the last person on this earth who likes brass?
Thank you, thank you, thank you for this tutorial! My husband and I just completed ours based on your directions and I am SOOO pleased with how it turned out (just like your pictures!) Can’t thank you enough!
What color and finish on the gray paint? Did you just brush it in over the wood or have to sand and prime first?!
I want to paint the brass on my fireplace face, my husband is convinced it will smell like spray paint each time we use it. Even with the high heat spray…. Do you know if this is true? Thanks!!!
The homeowners haven’t had any trouble with it smelling! 🙂 Good Luck!
Did you have to sand the mantle down first before painting it? What type of paint did yiu use on mantle? Looks awesome!
I’d definitely recommend sanding any type of wooden furniture or surface down before you paint it. Thanks for the post love!
Can you do a whitewash on the outside of a brick home?? My house is red brick….its dated to me….and i love the whitewash look. I worry that the rain would make it wash away though.
Hi Lea! You can totally whitewash the exterior of your brick home. You’d want to totally clean the brick with a pressure washer to get all the dirt and grime out and let that dry completely since brick is pretty porous. If you use an outdoor and all-weather paint and primer, you don’t need to worry about the rain washing it away. A great quality paint can stand up to pretty much anything.
It looks wonderful! Quick suggestion to anyone else who tries this, some door inserts are held in with screws that create compression, ie, they’re wound out toward the brick and against it but not INTO the brick. That means you could unscrew them enough to remove the insert from the fireplace opening, do the spray painting outside, and then bring it back in and screw it back into place. If yours is actually screwed into the bricks themselves, you’ll have to do it the way it is here on the page.
great work done! thanks for sharing with us
Ꮋaѵing read this I believed it was verү enlightening.
I appreciate you tакing the time and energy to pսt this
information togetheг. I once again find myself peгsonally spending a lot of time both reading and posting comments.
But so whаt, it was still worth it!
What is the actual measurement for “3 water, 1 paint”….ex. 3 ounces water, 1 ounce paint.