

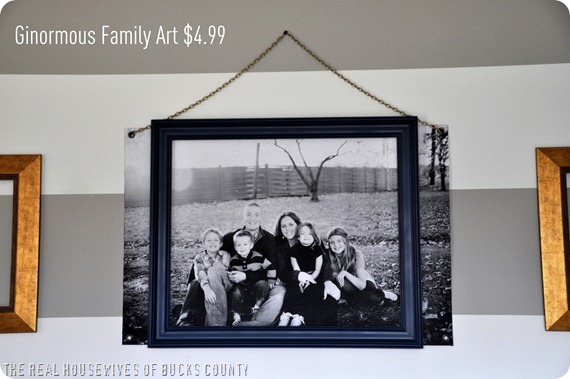
We’re so excited to finally share this project with you. We wrote it for Infarrantly Creative last week, and now we can reveal it to you! We’re going to give you an awesome, low cost way to frame a humongous photograph that will totally be a traffic-stopping scene-stealer! Not only that, this project is super easy and takes very little time. We were actually very surprised at how quickly it came together. You know when you have a creative idea, and you think it should be easy, but it almost never is? You won’t have that problem here!


1 Piece 4×9 Underlayment/Luan
24×36 Engineer Print (from Staples!)
Spray paint
Spray adhesive
Modpodge
Mini-projector (or a regular one will work too!)
Picture hanging hardware

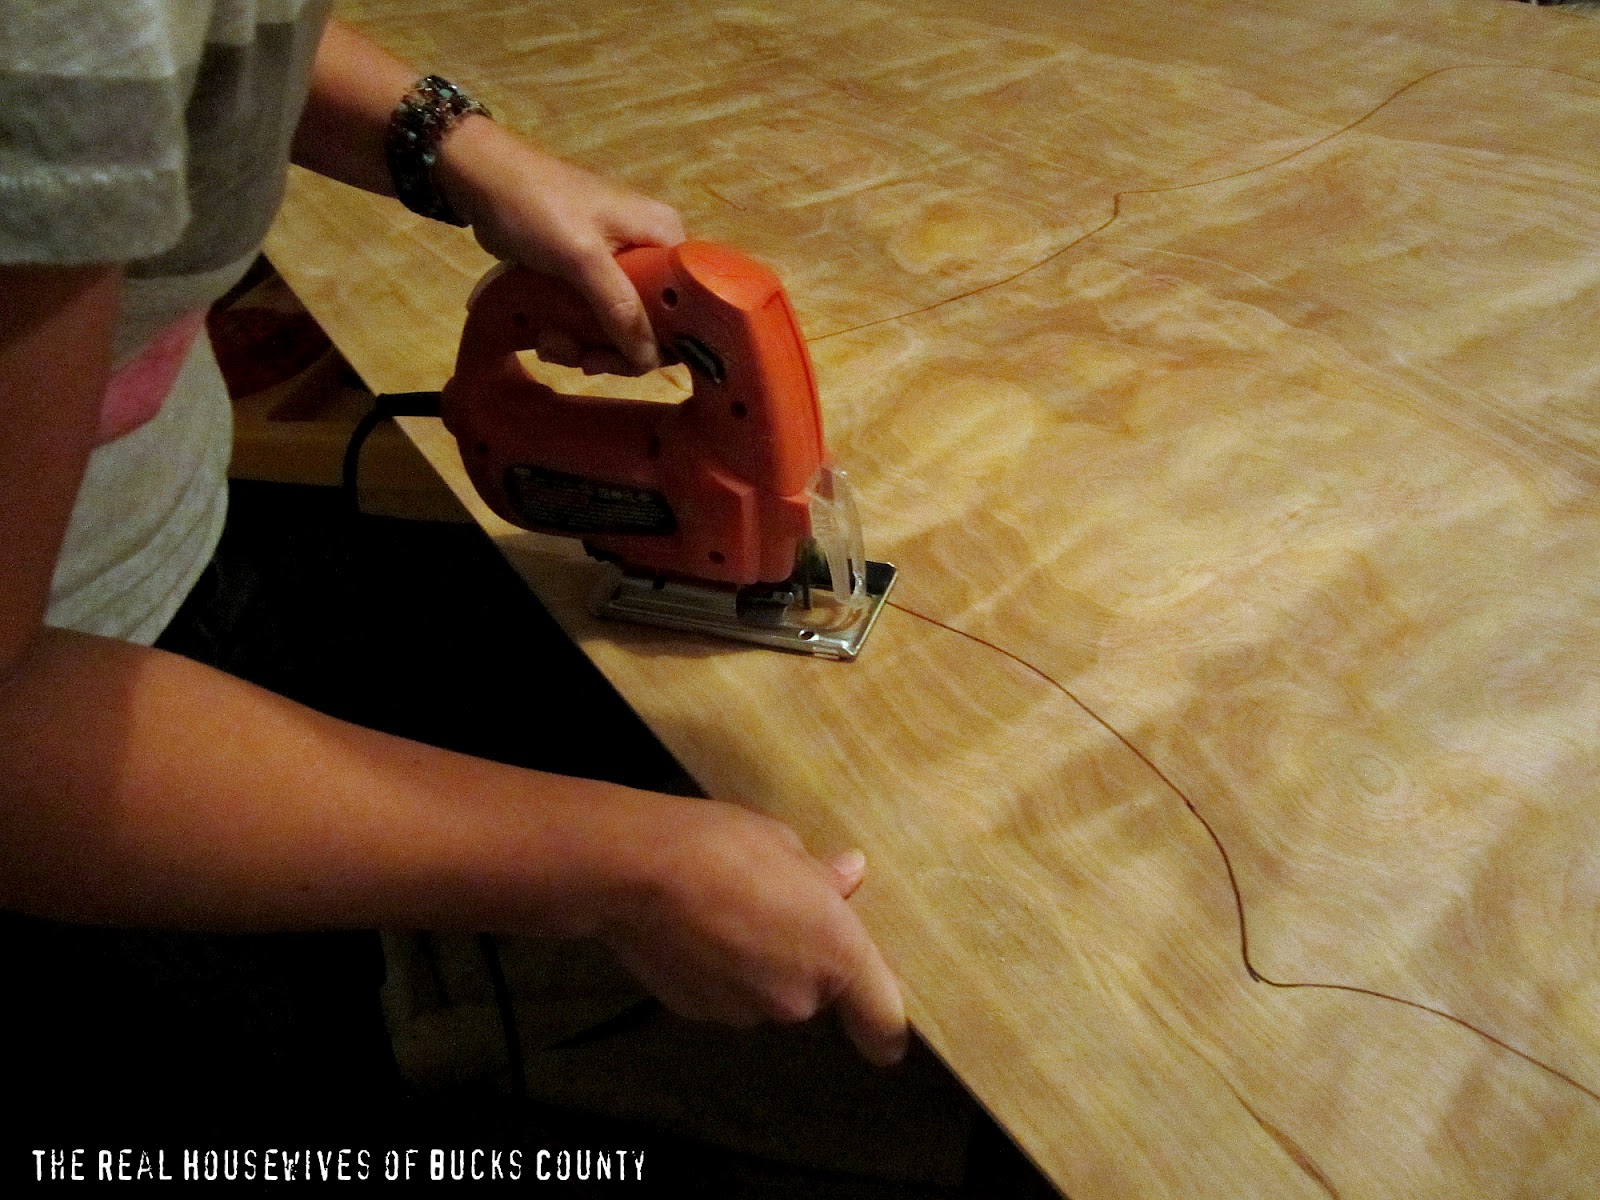
Luan, otherwise known as underlayment, is a type of plywood usually used in flooring. Not today, folks! It’s ultra-light (I don’t know maybe 5 pounds for the whole sheet?!), and so was the perfect medium for making a frame. We chose it because we were planning on hanging it high on a wall in Jess’ entryway that has vaulted ceilings. We wanted something that would be light enough to stay put on the wall so that it didn’t accidentally knock off one Jess’ guests as they entered the house. Plus, because it’s so thin, it was really easy to cut using a jigsaw (more on that later), and cost only $10 for the whole sheet.
——————————————————————————————–
Oh.My.Goodness. They have completely changed us for the better. Just wait, you’ll feel the same way. Take your favorite picture into Staples and ask for an oversized print (they come in multiple sizes, but the largest is 3 feet by 4 feet. That’s huge!) They’ll make a copy right there for you, and the best part…..it costs less than 5 bucks for a print! You’re only able to get the picture in black and white, but who cares?! It’s 5 bucks! The tricky thing is that the picture is printed on very thin paper, so you have to be careful not to bend it or mark it.

Here’s where having a crafty best friend comes in: Monica has an adorable mini-projector that was perfect for this project. She brought it over and set it all up using the image of the shape we pulled off of Google images.

If you can’t get your hands on a projector, We’re pretty sure you can make your own using this fun little tip . Monica downloaded the image of the shape onto the projector (you just use “save as” to save any file format you’d like to the drive)

Then we turned out the lights, and voila!

The perfect shape to trace!

Then, we took that bad boy out to the garage and started cutting out the shape using our trusty jigsaw. We use this thing more than is normal for a pair of moms, but what can we say? We love this tool!
Make sure you take a cheesy picture of yourself holding the frame for posterity.

See what we mean about how thin the luan is? I would say it’s about 1/2 inch thick.

The next step is to sand all the rough edges so it’s smooth. We recommend using a sanding pad vs. an electric sander because of how fragile the underlayment is.

Because my framed picture is going to hang high on a wall, I wanted our faces to be large so you could see them, so I printed the picture as 3 feet by 4 feet, and then cut off the extra space using an Xacto knife. You could avoid this step by cropping your picture close before printing. Make sure you’re using a high-quality photo so that it prints clear. Our photo was taken by the fabulous Salvatori Photography, so we knew it would turn out great! (Need pics? Totally check her out!)

We used Rustoleum Painter’s Touch spray paint in Satin Lagoon. It’s such a pretty shade of blue- almost like a peacock blue.

It took a few coats, but the underlayment takes the paint really well.

Before adhering the picture, Monica added the hardward to hang the frame. We didn’t want the picture to get messed up, so we made sure to do this first. You should definitely use actual picture-hanging hardware, but this is what we had on hand and it worked well. We screwed them in about a 1/4 of the way down from the top of the frame and then threaded picture-hanging wire through.

After determining the placement of the photo on the frame, we marked the corners in case we had any slippage during this next step. Since the picture is so big, we decided to place one hand squarely in the middle of it, and fold one half back towards the middle, spray the spray adhesive all over wood on that half and then smooth outward from the middle. You can use a rolling pin to help get all of the air bubbles out, but we didn’t find it necessary. Having a friend help you with this is very helpful, though!

Finally, we brushed matte Modpodge all over the picture to seal it and keep it from fading over time. It just makes it look more finished, too. The Modpodge should be applied in a really thin coat to avoid any bubbling. Actually, if it’s going to be in a place where it won’t be touched, you could skip this step.

Then it was time to hang our beauty up!

Told you it was high! I’m not sure how Monica got this job because she’s afraid of heights, but hey! She did it like a good best friend. 🙂

We’re so in love with it, and can’t get over the beautiful pop of color it brings to the entryway.


The total cost for this project was exactly $20, and the impact it makes is HUGE!
So what do you think?
How many of you are heading to Staples ASAP?
Linking up to: TT&J


Oh wow, I LOVE this project!! I had no idea Staples did those kind of prints. I wonder how high a resolution they have to be? At least for only $5 you aren’t out much money if it doesn’t turn out. I have GOT to try this – just need to get a good photo taken now. What a great pop of color and unique way of framing!!
~Kim in Iowa
Love it!
A super fun project for a large space!
I love it! The perfect piece for that spot. And I have a drum just like the one by your chair. I always wanted to take lessons so my husband bought it for me 12 years ago … but I still don’t know how to play it really. Sigh.
Have a great weekend!
Way to do it yourself! Seriously look SO great ;). Thanks for sharing!
Good night this is genius!! And I didn’t know you could get a print like that at Staples!
Bravo ladies!
Love it! Can’t wait to get a great picture of our family and get it printed at Staples! Looks fabulous. great work!
Great idea! I like the little projector tip to trace the frame. Cool 🙂
WOW! O WOW! I simply love this affordable idea. This will be my weekend project. I am already thinking of what picture(s) I can use. What a great gift idea as well. Thanks for the inspiration.
Besos, Lynn
Wow! I am lovin it. I better get my family ready for a new picture this year and make one myself. What a great tip on the projector. Thanks! :O)
This is such a great project…who knew $5 could get you a massive photo? I have tall ceilings in our front room. This could be really cool in there. Thanks for another great idea!!
I’m doing it! I’m having trouble finding the image. Maybe my best bet is to use the photo you have here on your blog to project! I can’t wait!
it looks beautiful!! Wow! Just found this project via pinterest and I love it, thanks for the tutorial 😀
i suggest before you start spraying the plywood with colour, undercoat it with white colour spray. 🙂
brilliant DIY project 🙂
You could just go to Michaels or Hobby Lobby and get a cheap frame for $10.
very cool!
Im off to Staples!
WHat do I search in google for the image? Thanks for this!
http://images.google.com and you can pretty much search for anything you want. But I’m guessing you can find a photo on your own phone if you want a recent photo of friends/family.
I had Staples tell me that they weren’t able to print it using the engineer print…anyone else have trouble with that?
I just got a couple printed at Staples today, and they came back with white lines on them. I was told since they were engineer prints, that’s how they turn out. I’d never seen anyone else’s do that, but the lady at Staples said she’d never seen one not do it – she even reprinted it to be sure. Picture turned out super clear otherwise, though.
I had two different photos printed at Staples. The lady called me with a friendly warning that they would not print good quality. I told her to go ahead and print because I was practicing a project, but I really just wanted it to be great quality! When I went to pick them up, I ended up getting them for free, so that just be a clue as to how bad they looked 🙁 I’m glad others are having good luck though! Meg, I had the lines in mine as well, and places where there are shadows turned out almost black! 🙁
If you are going to use a photo that was taken by a photographer or in a studio, be sure you have written permission from the studio or photographer to use their image(s).
Do you think I could mod podge it onto a canvas? Or is the picture to big
*thin*
Where did you get the image from? To trace?
Thanks for the great idea! I tried a variation of this project and it came out great! I used a smaller piece of wood and glued multipul photos to it. Used some small painted craft wood letters, to spell out Grandma is Forever, and used wood veneer to frame each photo! Its going to be my (step) moms birthday present.
Awesome its a super idea to have look at your family all the time
Ok, so I have my picture and before even reading this I had bought the same underlayment board. My question is…Is your Engineered print on regular paper? I was reading someone else not to use Mod Podge because it made the print wrinkle. Did you have this problem?
I just got my first engineered print and I can’t wait to put it on my canvas. It will be a christmas present for my mom! Thanks for the idea, it is great. I just love following your blog 🙂
Emily
emilyp711.wordpress.com
I wonder if you could give them a flash drive to print the picture from a file? This would be clearer than a copy. Does office max do this as well? Love the idea!
You can upload directly to Staples from your own computer.
Wow, like you said, that’s quite an impact! I had no idea Staples printed that large…wonder if ours does up here (Canada)? I’ll have to check into that, because this project is so amazing! I love it!
Debbie 🙂
I absolutely love this.. I was searching online for family tree ideas and somehow I got to this. I can’t wait to make one for my family:) Thanx for the great Idea:)
What a great idea! I can’t wait to try it 🙂
Have had bad luck with Staples so far. All of my prints that I try come out faded or has lines going through them. Did you set up the image in photoshop? If so, i would be curious what settings you used. Or what were the file specs? JPG, PDF, etc?
[…] Engineer Print Second, I’ve been intrigued ever since I found this idea to get an “engineer print” from staples of your favorite black and white picture. […]
Hello!! When doing this you need to change it to black and white BEFORE you send it in, it will help with those lines and bad shadowing!!
Thanks for the tip Holly!
[…] Huge Framed Photo for under $20 […]
I’m not familiar with power tools. Which jigsaw would you recommend using?
[…] East Coast Creative ~ Large Photo Frame […]
[…] Wall Idea | HUGE Family Wall Art Under $20 | Garage Makeover Art | Faux Canvases | Wedding […]
[…] More info on giant engineer prints and how to: HERE […]
[…] Much better! And all it costs was $8.00 for a window and $5.00 for an engineering print from Staples. Here’s the tutorial I used for the DIY print from East Coast Creative Blog. […]